Wednesday, October 23, 2013

Pumpkin Waffles With Maple Whipped Cream

Source: Picture-Perfect Meals

Ingredients

Non-stick cooking spray
2 cups all-purpose baking mix (homemade bisquick)
1 teaspoon pumpkin pie spice
1 cup milk
1/2 cup canned pumpkin
1 teaspoon vanilla extract
2 tablespoons unsalted butter, melted
1 tablespoon vegetable oil
1 large egg
1 cup heavy cream
2 tablespoons maple syrup

Preparation

(1) Lightly grease a waffle maker with some non-stick spray and preheat it according to the manufacturer's directions. In a bowl, whisk together the baking mix and pumpkin pie spice. Make a well in the center of the flour mixture.

(2) In a glass measure, combine the milk, pumpkin, vanilla, butter, oil and egg. Whisk until smooth. Add to the flour mixture and stir until just combined (a few lumps is okay).

(3) Add batter to the waffle maker and close the lid. Bake according to the manufacturer's directions until done. Remove the waffle with a fork. Repeat with the remaining batter and serve warm.

(4) Make the maple whipped cream: In a bowl, using a handheld electric mixer, beat the cream with the maple syrup until soft peaks form. Serve with the warm waffles.

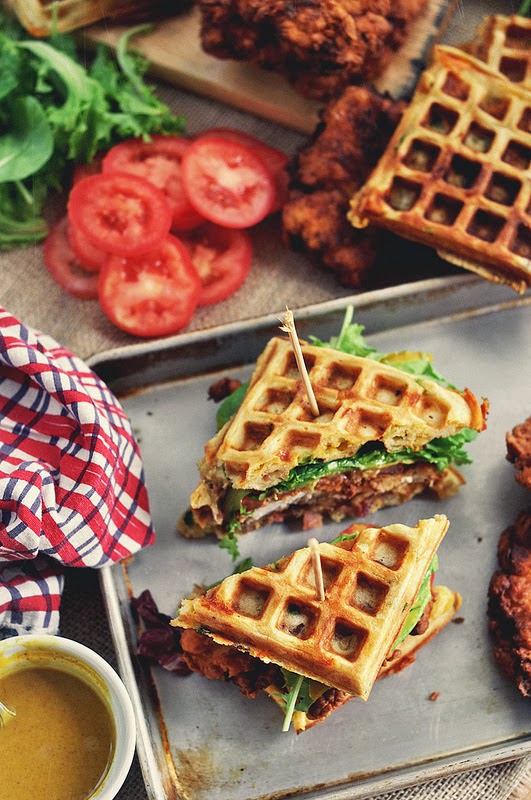
Fried Chicken and Waffle Sandwiches

Source: The Candid Appetite

Bacon Cheddar Green Onion Waffle Ingredients

Yield: about 15 waffles, depending on waffle iron size

2 cups (250 grams) all-purpose flour
1/4 cup (55 grams) light-brown sugar
1 teaspoon (8 grams) baking soda
1 1/2 teaspoon (6 grams) baking powder
1/2 teaspoon (4grams) salt
2 teaspoons (14 grams) freshly cracked black pepper
3 large eggs, room temperature
1/3 cup (76 grams) unsalted butter, melted and cooled
2 cups (484 grams) buttermilk, room temperature
6 slices bacon, cooked and crumbled
1 cup (100 grams) cheddar cheese, shredded
5 scallions (green onions) thinly sliced
cooking spray, for waffle iron

Preparation
(1) Preheat waffle iron.

(2) In a large bowl stir together the flour, brown sugar, baking soda, baking powder, salt and black pepper. Make a well in the center of the bowl and set aside.

(3) Crack the eggs into a small bowl and whisk together. Pour into the center of the dry ingredients. Add the melted butter and buttermilk. Using a wooden spoon, stir the waffle batter until just combined. It should be slightly lumpy. If the batter appears to be too thick, add a splash of buttermilk and stir until pouring consistency is reached. Fold in the cooked chopped bacon, shredded cheddar cheese, and sliced green onions.

(4) Lightly grease the waffle iron with cooking spray or melted butter. Pour in about 1/2 cup batter in each waffle cavity, more or less depending on size of waffle iron. Cook until the waffles are golden brown and crispy. Mine were about 4-6 minutes. Place the waffles on a cooling rack set over a baking sheet. Place in a 200 degree F oven to keep the waffles warm until ready to eat. Continue cooking until all the batter is used up. Waffles will keep in the fridge for up to 4 days. To rewarm, place the  waffles on a baking sheet in a 300 degree F oven for about 5 minutes until crispy.

Buttermilk Fried Chicken Ingredients

Yield: 4 servings

4 chicken breast cutlets, cut in half so you end up with 8 half pieces
1 1/2 cups (363 grams) buttermilk
1 tablespoon (15 mil) hot sauce, optional
1 1/2 cups (188 grams) all-purpose flour
1 teaspoon (6 grams) salt
1 teaspoon (6 grams) cayenne pepper
1 teaspoon (6 grams) garlic powder
1 teaspoon (6 grams) black pepper
Canola oil for frying

Preparation

(1) Place the chicken in a large bowl. Cover with buttermilk and add the hot sauce, if using. Toss together until evenly mixed and all the chicken is submerged in the buttermilk. Cover with plastic wrap and place in the fridge for at least 30 minutes. If you don't have the time, this step is not crucial but it will help make the chicken tender and juicy.

(2) In a shallow dish combine the flour, salt, cayenne pepper, garlic powder, and black pepper. To coat the chicken, grab a piece from the buttermilk bowl, slightly drain off, and throw into the flour. Pat the flour into the chicken, on both sides. Return to the buttermilk bowl (with the rest of the chicken) and coat both sides. Place the chicken back into the flour, once more, and coat both sides. We're double dipping the chicken. Lay the coated chicken on a rack placed over a baking sheet. Repeat in this manner until all the chicken is coated. Allow the coated chicken to rest for at least 10 minutes, this will allow the fry to dry a bit and stick to the chicken.

(3) In the meantime, heat about 2 inches of oil in a heavy duty pan, such as a cast iron skillet. Once the oil is hot, fry the chicken in batches. Cook for about 5 minutes on the first side, turn over once golden brown and crispy, continue to cook for another 4 minutes on the other side. Drain the chicken and place on a separate rack set over a baking sheet. You can keep the cooked chicken warm in a 200 degree F oven until all the chicken is fried and you're ready to serve.

Maple Mustard Sauce Ingredients

Yield: 1/2 cup

1/4 cup (50 ml) real maple syrup
3 tablespoons (45 ml) yellow mustard
3 tablespoons (45 ml) spicy brown mustard or Dijon mustard

Preparation

Whisk all the ingredients together in a small bowl until smooth. Will keep in refrigerator for 1 week. Enjoy!

Tuesday, October 22, 2013

Paleo Roasted Stuffed Pork Tenderloin

Source: Paleo Cupboard

Ingredients

Tenderloin:
2 pork tenderloins (about 2 1/2 pounds altogether)
4 slices bacon (and bacon fat created from cooking the bacon)
8 ounces mushrooms, sliced
2 tablespoons fresh rosemary
2 tablespoons fresh thyme
1/2 teaspoon sea salt (divided)
1/2 teaspoon ground pepper ( divided)
3 cloves garlic, chopped
4 cups fresh spinach

Lemon Parsley Oil:
4 tablespoon olive oil
2 teaspoon lemon zest
3 tablespoon fresh parsley
1/4 teaspoon sea salt
Dash ground black pepper

Preparation

(1) Preheat oven to 375F with oven rack set in the middle of the oven.
(2) Cut your onions and mushrooms. Cook the bacon in a large skillet over medium-high heat until crisp. Set bacon aside and keep the bacon fat in the pan.
(3) Using the same pan, add the onion, mushrooms, 1/4 teaspoon sea salt, 1/4 teaspoon ground black pepper, fresh thyme and rosemary and sauté for 3 minutes, stirring occasionally. Next add the garlic and spinach and toss to coat. Cook for another 2 minutes until spinach is wilted. Remove from heat and set aside.
(4) Butterfly the park tenderloins by cutting down the middle length of each one but not cutting it all the way through, and spread the meat flat (like you are opening a book).
(5) Cover the tenderloins with plastic wrap and pound with a meat mallet until about 1/2 inch thick. Sprinkle the remaining 1/2 teaspoon sea salt and 1/2 teaspoon ground pepper on the tenderloins.
(6) Spread the spinach mixture over the two tenderloins evenly and spread it to reach the sides. Crumble the bacon and add it on top of the mixture. Roll the tenderloin, starting at the narrow end, and secure with toothpicks. Place the tenderloins in a roasting pan.
(7) Cook the tenderloins for 45 minutes, or until the inside reaches 145F on a meat thermometer.
(8) While the tenderloins are cooking, make the lemon oil by combining all ingredients together in a small mixing bowl and stirring with a spoon or whisk. Set aside.
(9) When the pork is done, transfer to a cutting board and allow to rest for about 10 minutes, lightly covered in aluminum foil. Remove the toothpicks and slice the pork rolls. Serve with the lemon sauce.

Softbatch Cookie Butter Brown Sugar Cookies

Source: Averie Cooks

Ingredients

1 large egg
1 cup creamy cookie butter or Biscoff Spread (the recipe will work with peanut butter as a substitute but the flavor will be totally different)
3/4 cup light brown sugar, packed (dark brown may be substituted)
11/2 tablespoons vanilla extract (yes tablespoons, not teaspoons)
3/4 cup plus 2 tablespoons all-purpose flour (or up to 1 cup flour as necessary, see directions below)
2 teaspoons cornstarch
11/2 teaspoons cinnamon
1 teaspoon baking soda
Pinch salt, optional and to taste

Preparation

(1) To the bowl of a stand mixer fitted with the paddle attachment (or large bowl and electric hand mixer), cream together the egg, cookie butter, brown sugar, and vanilla on medium-high speed until light and fluffy, about 4 to 5 minutes. Do not shortchange this creaming step, and if using a hand mixer, 6 to 7 minutes may be necessary. Don't overbeat or overdo it so that the oils start releasing (more prone to happening with peanut butter than cookie butter); just make sure the mixture is properly creamed.

(2) Stop, scrape down the sides of the bowl, and add 3/4 cup plus 2 tablespoons flour (which is 1 cup minus 2 tablespoons), cornstarch, cinnamon, baking soda, optional salt, and mix on low speed until just incorporated, about 1 minute; don't overmix. The dough will be soft and on the oily side, but it should come together and not be sticky, tacky, or wet. If it is, add up to 2 more tablespoons of flour, for a total of 1 cup, and mix to incorporate. Due to climate and variance in ingredients such as moisture level of brown sugar, volume of egg, brand of cookie butter, etc., the flour amount could vary by a few tablespoons.

(3) Using a medium 2-inch cookie scoop, form heaping two-tablespoon mounds. Place mounds on a large plate, flatten mounds slightly, cover with plasticwrap, and refrigerate for at least 3 hours, or up to 5 days, before baking. Do not bake with warm dough because cookies will spread and bake thinner and flatter. Properly chilled dough is mandatory.

(4) Preheat oven to 350F, line a baking sheet with a Silpat, or spray winds on baking sheet, spaced at least 2 inches apart. Bake for 8 minutes, or until edges have set and tops are just beginning to set, even if slightly undercooked, pale and glossy in the center. Do not bake longer than 9 minutes if you want Softbatch-style cookies because they firm up as they cool (the cookies shown in the photo were baked with dough that had been chilled overnight, allowed to come to room temperature while the oven preheated, and were baked for 8 minutes. They have slightly chewy edges with soft, pillowy, gooey centers). Allow cookies to cool on the baking sheet for about 5 minutes before removing and transferring to a rack to finish cooling.

(5) Store cookies airtight to room temperature for up to 1 week, or in the freezer for up to 4 months. Alternatively, unbaked cookie dough can be stored airtight in the refrigerator for up to 5 days, or in the freezer for up to 4 months, so consider baking only as many cookies as desired and save the remaining dough to be baked in the future when desired.

Monday, October 21, 2013

Grown-Up Grilled Cheese

Source: Just a Taste

Ingredients

For the caramelized onions:
2 teaspoons vegetable oil
1 large onion, thinly sliced
1 teaspoon salt
1/8 teaspoon black pepper
2 tablespoons sugar
1/4 cup balsamic vinegar

For the grilled cheese:
1 tablespoon unsalted butter
4 slices bread (such as sourdough or brioche)
4 slices sharp cheddar cheese
1 cup kale leaves

Preparation

Make the caramelized onions:
Heat the vegetable oil in a medium saucepan over medium-low heat. Add the sliced onions, salt and pepper and cook, stirring occasionally, until the onions are very soft, about 10 minutes.

Add the sugar and continue cooking the onions for 5 more minutes.

Add the balsamic vinegar and reduce the heat to low. Continue cooking the onions, stirring occasionally, for about 15 minutes until they are very soft and dry.

Assemble the grilled cheese:
Slather one side of all four slices of bread with the butter and set them aside.

Assemble one of the grilled cheese sandwiches by stacking one slice of cheese atop one slice of bread (the non-butter side) and topping it with half the caramelized onions, half the kale leaves and a second slice of cheese. Top it with another buttered slice of bread (buttered side on top). Repeat the assembly process for the second grilled cheese sandwich.

Heat a large skillet or sauté pan over medium heat. Place each sandwich on the skillet and cook until the bread is toasted and golden and the cheese begins to melt. Flip each sandwich once and continue until the opposite side is toasted. Slice and serve immediately.

Sunday, October 20, 2013

Roasted Sweet Corn and Tomato Soup

Source: Our Best Bites

Ingredients / Preparation

The base of this soup is sweet, fresh corn. You'll need about 4 ears.

You can use any variety of garden tomatoes in your garden, just quarter them before roasting and you'll be good to go. You can buy 10 ounce containers of cherry tomatoes in the grocery store and those work great, too. I'm using a few red ones from the grocery store and a few of these little orange cutie-pies that my friend brought over.

You'll need to remove the corn from the corn cobs.

Toss the corn and tomatoes on a foil-lined baking sheet (the foil is simply for easy clean up; you can skip that step if you love scrubbing roasted vegetable gunk off of metal pans) and then we'll add a bunch of chopped garlic, a light sprinkling of kosher salt and fresh cracked black pepper, and a little drizzle of olive oil.

The oven then does magical things as the veggies roast and caramelize and release natural sugars. Your house will smell amazing.

While those are doing their thing in the oven, heat up a stock pot to medium high heat. Add a little olive oil and some diced onion.

I wanted the smoky sweetness of fire-roasted bell peppers, but I really didn't want to take the time to roast one myself, so I use a jar since it's something I almost always have in my pantry. An 8-ounce jar is equivalent to about 1 medium sized bell pepper.

Just give them a rough dice before you toss them in the pot.

The two seasonings that will give a ton of flavor to our roasted veggies are chipotle chili powder and smoked paprika. Both go beautifully with corn and tomatoes and are a perfect compliment to this flavor profile. Since we're making soup here, we definitely need some broth. Use chicken broth, unless you need to make this vegetarian and you can experiment with vegetable broth. When given the choice of the two however, I'll always go with chicken broth since it has more flavor.

Take the corn and tomatoes out of the oven when your tomatoes look all wrinkled.

The corn will probably be turning a little golden brown, but it's okay if it's not. Scrape every last bit of that pan into your soup pot and bring it to a simmer.  Cover the pot and keep it at a low simmer for about 20 minutes. All of those flavors come together in a sweet, smoky combination.

You can use an immersion blender to puree the soup, but I actually prefer my blender for this one since the corn has so much texture. Remember when you put anything hot in your blender to remove that little stopper at the top. It's important that the steam has somewhere to go. The other important step is that you cover it with a folded paper towel before you press start!

Puree the soup until it's smooth. Even after blending for quite a while, it will still have a little texture from the corn, which I like.

Avocado & Peanut Noodle Spring Rolls

Source: Refinery29

Ingredients

Leftover peanut noodles
Rice spring-roll wrappers
Mushrooms
Basil and mint
Avocado slices
Ponzu for dipping

Preparation

(1) Heat skillet to medium. Add a little bit of oil, and cook mushrooms until browned and soft.
(2) Remove from heat; add a little soy sauce. Let cool to room temperature.
(3) Wrap ingredients in spring-roll rice wrappers and serve with ponzu for dipping.

Irresistible Pumpkin Pie Cupcakes

Source: The Krazy Coupon Lady

Ingredients

1 15-oz can pumpkin puree
1/2 cup sugar
1/4 cup brown sugar
2 large eggs
1 teaspoon vanilla extract
3/4 cup evaporated milk
2/3 cup all-purpose flour
2 teaspoon pumpkin pie spice
1/4 teaspoon salt
1/4 teaspoon baking powder
1/4 teaspoon baking soda

Preparation

Preheat oven to 350 degrees. Line 12 cup muffin tin with silicone liners, foil liners sprayed with cooking spray or just spray the cups with cooking spray. Either of these three methods will make it easy to take the cupcake out after it's cooked. Paper liners make it difficult to remove the cupcakes.

Mix the pumpkin, sugar, brown sugar, eggs, vanilla extract and milk. Add the flour, pumpkin spice, salt, baking powder and baking soda to the mixture. Fill each muffin cup with 1/3 cup of the mixture. Bake for 20 minutes and let cool for 20 minutes. Remove cupcakes from pan and chill in the fridge for 30 minutes. Top with whipped cream and sprinkle more pumpkin pie spice on top and serve. Makes 12 cupcakes.

Cranberry-Pecan Crusts

Source: Southern Living, September 2002
 
 
Ingredients
 
1 (15-ounce) package refrigerated piecrusts
1/2 cup finely chopped pecans, toasted
1/2 cup finely chopped dried cranberries
 
Preparation
 
Unfold each piecrust, and press out fold lines. Sprinkle 1 piecrust with pecans and cranberries; top with remaining piecrust. Roll into a 14-inch circle, sealing together piecrusts. Cut into desired shapes with a 2- to 3-inch cutter. Place pastry shapes on a lightly greased baking sheet.
 
Bake at 425 degrees for 8 to 10 minutes or until golden.